NOTE: This tip requires basic C++ knowledge
Whenever i find something useful, i want to share it with others. Something recently that caught my eye was the ability to give blueprint nodes multiple outputs. Which output is executed is specified by your logic. This is done via the “ExpandEnumAsExecs” meta specifier for UFUNCTIONs.
Here is an example to get things started. The example we are going to use features an NPC and their dog. After the mission has been activated, the NPC will give the user a “find dog” mission when they speak to the player.
Logically speaking, When the NPC talks to the player; the blueprint node will check the current mission status. Afterwards it will execute a specific set of blueprint nodes based on the status of the mission.
NOTE: I also added some extra functions (Speak to Player, Activate Find Dog Mission, Give Player Rewards, and Mark Mission as Complete) to the screenshot to assist in understanding real world application of the mission.
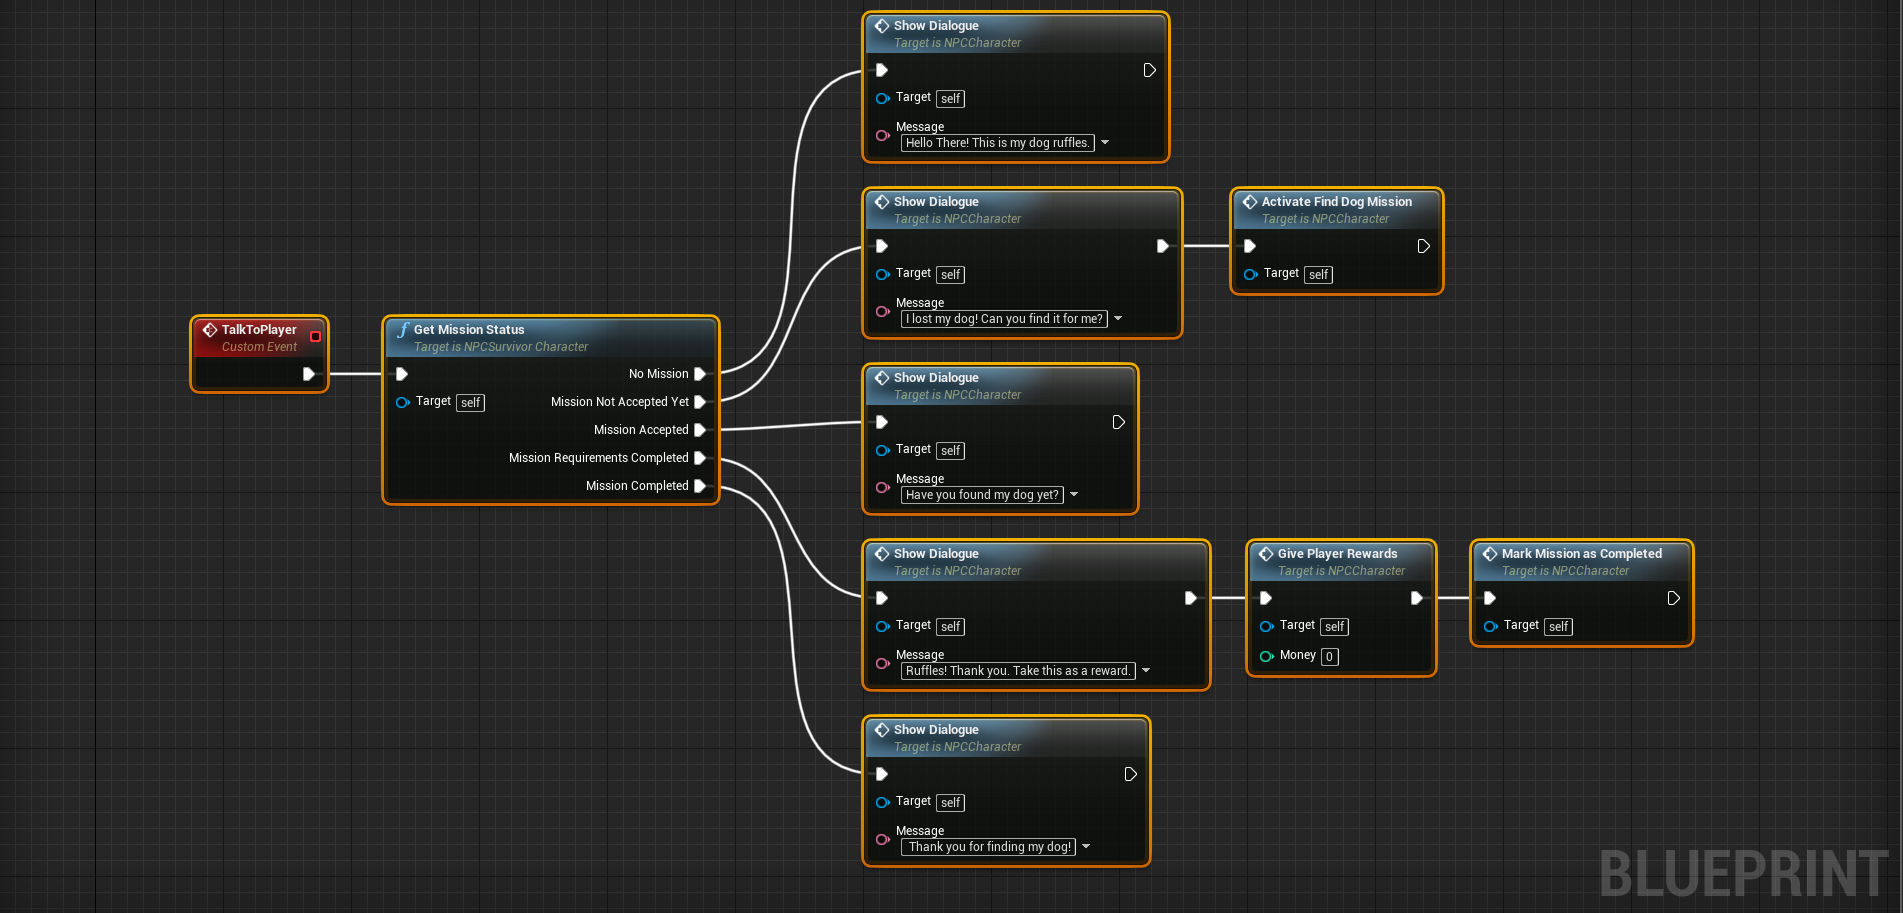
Here you can see the NPC will say something different for each status:
- Before the mission is active (aka No Mission) – Hello There! This is my dog ruffles.
- When the mission is active, but not accepted – I lost my dog! Can you find it for me?
- While the mission is active – Have you found my dog yet?
- Once you’ve completed the mission’s requirements (found her dog) – Ruffles! Thank you. Take this as a reward.
- After you have received your reward – Thank you for finding my dog!
Why would i want to do this?
This tip isn’t required for game development in unreal. It’s purpose is to help assist other developers. A developer would want to do this to simplify blueprint logic. Keeping a blueprint clean and readable is important when creating games using them.
Setting up the code
First you need an enumeration. This enumeration must be created in a c++ class.
// ANPCSurvivorCharacter.H
UENUM(BlueprintType)
enum class ENPCMissionStatus : uint8
{
	No_Mission,
	New_Mission,
	Active_Mission,
	Mission_Requirements_Completed,
	Mission_Completed
};
After your enumeration is complete, you need to declare a ‘BlueprintCallable’ UFUNCTION. This UFUNCTION should take in an out reference to the previously created function . In the meta data for this function, the “ExpandEnumAsExecs” specifier should be set. It’s value should be the name of the associated parameter.
// ANPCSurvivorCharacter.H
UCLASS()
class SOMESURVIVALGAME_API ANPCSurvivorCharacter : public ACharacter
{
	GENERATED_BODY()

public:

	UFUNCTION(BlueprintCallable, Category = "NPC|Missions", Meta = (ExpandEnumAsExecs = "MissionStatus"))
		void GetMissionStatus(ENPCMissionStatus & MissionStatus);
};
The above, once defiend properly will look like such:

Finally, you need to define the the previously declared function. In the function definition, you need to set the value of the passed in enumeration parameter.
// ANPCSurvivorCharacter.cpp
void ANPCSurvivorCharacter::GetMissionStatus(ENPCMissionStatus & MissionStatus)
{

	bool HasMission = false; // ... Implement your logic here
	bool IsMissionAccepted = false; // ... Implement your logic here
	bool HasCompletedMissionRequirements = false; // ... Implement your logic here
	bool IsMissionComplete = false; // ... Implement your logic here

	if (!HasMission) {

		MissionStatus = ENPCMissionStatus::No_Mission;
	}
	else if(!IsMissionAccepted){

		MissionStatus = ENPCMissionStatus::New_Mission;
	}
	else if (!IsMissionComplete) {

		MissionStatus = ENPCMissionStatus::Active_Mission;
	}
	else if (HasCompletedMissionRequirements) {

		MissionStatus = ENPCMissionStatus::Mission_Requirements_Completed;
	}else {

		MissionStatus = ENPCMissionStatus::Mission_Completed;
	}
}
Thats it. The example chosen should be pretty easy to understand, but this can be applied to anything your game needs.
