Think, Sleep, and Play Games is an indie game development studio. Also just called TSP Games or TSP, TSP's interest range from hyper casual to AA Indie Games.
Often while making games in Unreal i’ll use the basic 3D primitive shapes(spheres,cubes,planes,cylinders,and cones) for prototyping levels. In Unreal Engine you can merge a set of actors into a new (reusable) static actor.
This is great for building levels and props without 3D modelling experience, or if you need a placeholder until the actual prop is ready.
To merge actors into a single static mesh, select a group of actors. Then right-click on them. There should be a menu option named “Convert Actors to Static Mesh“. Select that option, then choose the save location and name. After that, you can reuse the created static mesh as many times as you want.
One caveat is that the origin isn’t always where you want it to be, but that is a minor inconvenience for such useful fuctionality.
Example – A Simple Fence
Step 1, Drag a basic cube onto the scene.
Step 2, move & scale the cube. Then create duplicates, and move & scale them. You should end up with a fence made up of multiple Cube static mesh actors.
Step 3, select the cubes and right-click.
Step 4, select “Convert Actors to Static Mesh” and, select a save name and location.
Name it whatever you like.
Step 6, locate your new static mesh.
The default save location is “Content/meshes”, but you can specify anywhere.
Step 7, drop it in the scene. NOTE: The existing actors will still be in the scene after you create the static mesh, you can reuse them, or delete them once you have confirmed it’s creation.
Our new simple fence static mesh! Only One item in the world outliner!
And that’s it!
Why would i want to do this?
It reduces the amount of actors in the world outliner.
It allows you to easily build levels without 3d modelling experience.
It’s fast & quick. Great for Game Jams and prototyping.
In my entry for the August 2019 Community Game Jam, i did this with the buildings. Each building probably consists of 10+ Cubes. I built out the building, merged the 10+ actors into a static mesh, and saved a lot of space in my world outliner.
This one is a shorty. Be careful when setting the default game state class for custom game modes. Choosing a game state class that extends “GameState” can break your player controller somewhat.
My personal Experience
I was experiencing an issue with my player controller. You might have guessed it, my player controller was not working. Oddly, the tick function was running; but the BeginPlay event was not being called. This messed up a bunch of other things. After a lot of stress, i switched the game state class from “GameState” to “GameStateBase” and it worked.
I really wish unreal had popup notifications for this. Maybe i’ll do a post explaining the differences later when i read up more about it.
Whenever i find something useful, i want to share it with others. Something recently that caught my eye was the ability to give blueprint nodes multiple outputs. Which output is executed is specified by your logic. This is done via the “ExpandEnumAsExecs” meta specifier for UFUNCTIONs.
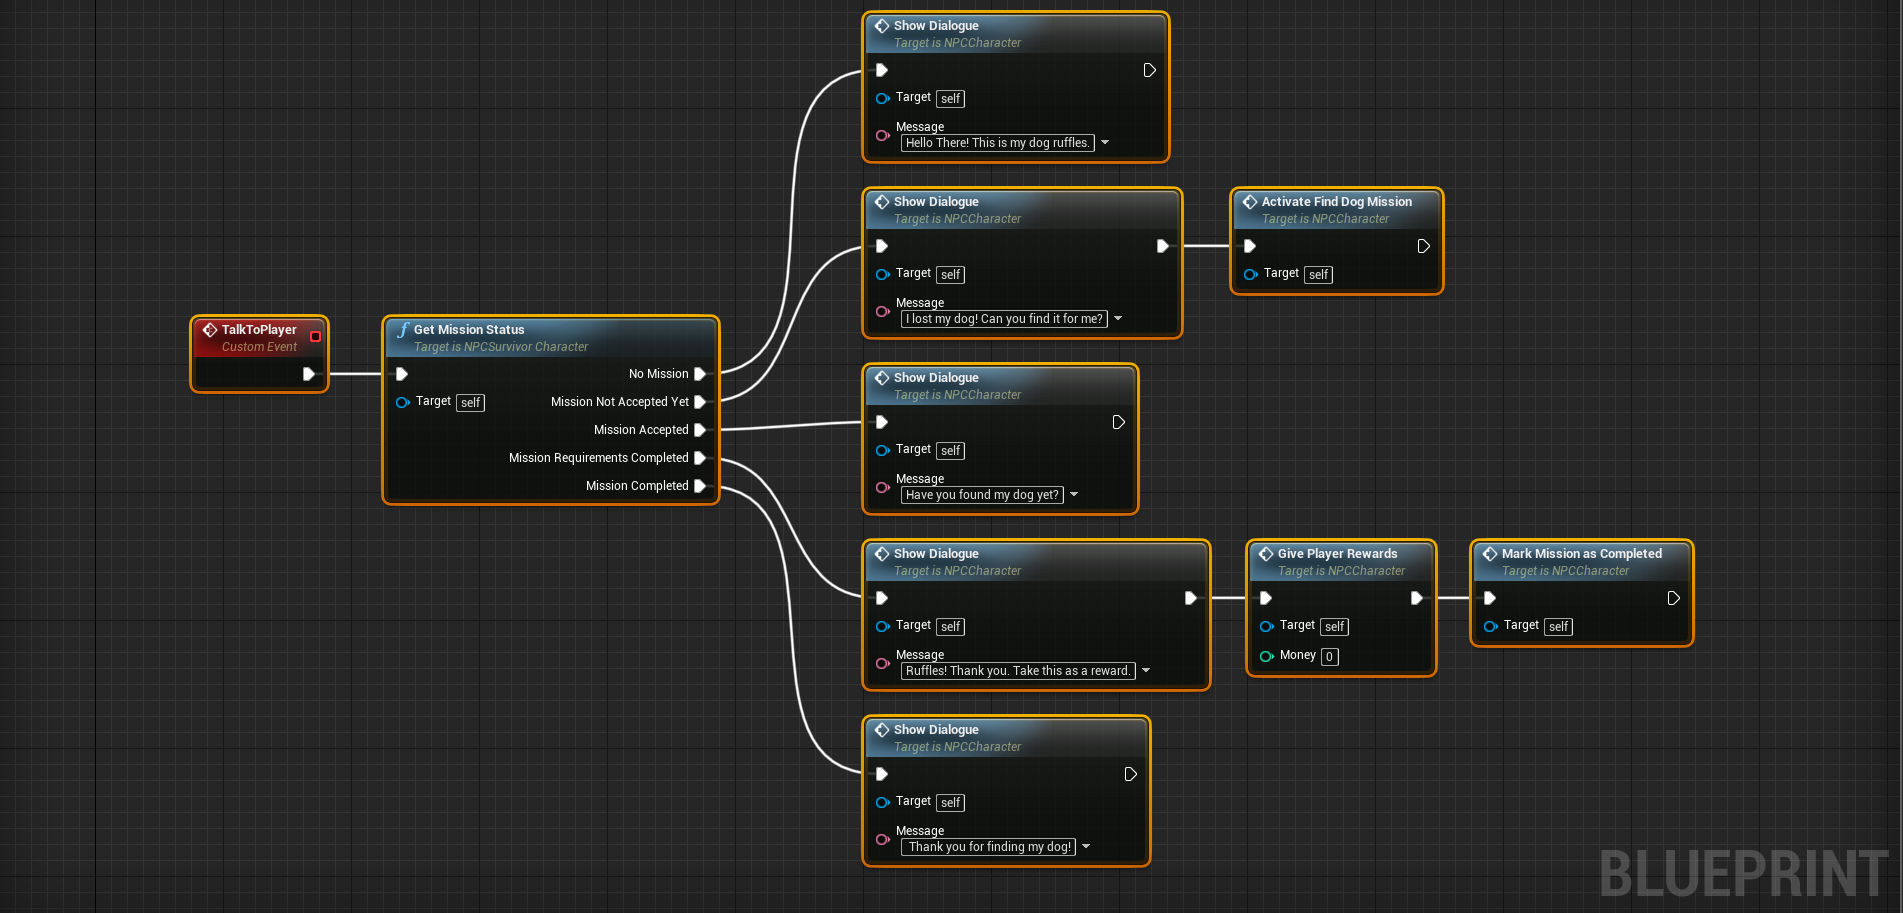
Here is an example to get things started. The example we are going to use features an NPC and their dog. After the mission has been activated, the NPC will give the user a “find dog” mission when they speak to the player.
Logically speaking, When the NPC talks to the player; the blueprint node will check the current mission status. Afterwards it will execute a specific set of blueprint nodes based on the status of the mission.
NOTE: I also added some extra functions (Speak to Player, Activate Find Dog Mission, Give Player Rewards, and Mark Mission as Complete) to the screenshot to assist in understanding real world application of the mission.
Here you can see the NPC will say something different for each status:
Before the mission is active (aka No Mission) – Hello There! This is my dog ruffles.
When the mission is active, but not accepted – I lost my dog! Can you find it for me?
While the mission is active – Have you found my dog yet?
Once you’ve completed the mission’s requirements (found her dog) – Ruffles! Thank you. Take this as a reward.
After you have received your reward – Thank you for finding my dog!
Why would i want to do this?
This tip isn’t required for game development in unreal. It’s purpose is to help assist other developers. A developer would want to do this to simplify blueprint logic. Keeping a blueprint clean and readable is important when creating games using them.
Setting up the code
First you need an enumeration. This enumeration must be created in a c++ class.
After your enumeration is complete, you need to declare a ‘BlueprintCallable’ UFUNCTION. This UFUNCTION should take in an out reference to the previously created function . In the meta data for this function, the “ExpandEnumAsExecs” specifier should be set. It’s value should be the name of the associated parameter.
// ANPCSurvivorCharacter.H
UCLASS()
class SOMESURVIVALGAME_API ANPCSurvivorCharacter : public ACharacter
{
	GENERATED_BODY()

public:

	UFUNCTION(BlueprintCallable, Category = "NPC|Missions", Meta = (ExpandEnumAsExecs = "MissionStatus"))
		void GetMissionStatus(ENPCMissionStatus & MissionStatus);
};
The above, once defiend properly will look like such:
ExpandEnumAsExecs = “MissionStatus”
Finally, you need to define the the previously declared function. In the function definition, you need to set the value of the passed in enumeration parameter.
// ANPCSurvivorCharacter.cpp
void ANPCSurvivorCharacter::GetMissionStatus(ENPCMissionStatus & MissionStatus)
{

	bool HasMission = false; // ... Implement your logic here
	bool IsMissionAccepted = false; // ... Implement your logic here
	bool HasCompletedMissionRequirements = false; // ... Implement your logic here
	bool IsMissionComplete = false; // ... Implement your logic here

	if (!HasMission) {

		MissionStatus = ENPCMissionStatus::No_Mission;
	}
	else if(!IsMissionAccepted){

		MissionStatus = ENPCMissionStatus::New_Mission;
	}
	else if (!IsMissionComplete) {

		MissionStatus = ENPCMissionStatus::Active_Mission;
	}
	else if (HasCompletedMissionRequirements) {

		MissionStatus = ENPCMissionStatus::Mission_Requirements_Completed;
	}else {

		MissionStatus = ENPCMissionStatus::Mission_Completed;
	}
}
Thats it. The example chosen should be pretty easy to understand, but this can be applied to anything your game needs.
If you’re developing a game in Unreal Engine and you are using the C++ API, this tip should save you some time. In the Engine’s editor preferences, you can disable automatically compilation when new c++ classes are added.
NOTE: This tip is for those using c++ projects. The tip also doesn’t require much technical knowledge, so blueprint users should be able to understand it as well.
Type “compile” in the search box to find the setting, then make sure the checkbox is unchecked.
Why would i do this?
I do this to avoid having to wait unnecessarily when creating multiple classes. Compilation after creating new classes doesn’t take an abnormally long amount of time, but when you are in a groove it can be annoying. In addition, with the option unchecked; you can actually edit your newly created class before compilation. Being able to edit classes before manually compiling saves time as well.
Here’s an example to explain what i mean, and the gains of disabling this setting.
Example – Adding two classes.
Let’s say you want to add two more c++ classes to your Unreal project. For the sake of the example, let’s assume it takes your engine 1 minute to re-compile after creating a new c++ class, and it will take you 5 minutes to actually code the new classes.
With the setting enabled, here is how things would go:
You create a new c++ class
The engine re-compiles (1 minute)
You create a second new c++ class
The engine re-compiles again. (1 minute)
You edit the created classes. (5 minutes)
You manually re-compile. (1 minute)
If you disable the setting, you would cut out the first 2 re-compilations. The overall time difference would be as follows:
Automatic Compilation Enabled: 8 minutes
Automatic Compilation Disabled: 6 minutes
Wow! A WHOLE 2 MINUTES!! Yeah…. i know, not a big deal. But if you want to create 3 classes that turns into a 3 minute difference. Also, depending on your machine; what if re-compilation takes 2 minutes? Then that 8 minutes turns into 11 minutes, whereas the 6 minutes only turns into 7 minutes. If recompilation for your takes 2 minutes, there is a 4 minute difference.
It’s definitely not required for game development with Unreal Engine. I just thought i’d let other people know it’s there. Automatic compilation after creating c++ classes was very annoying for me for a while. I now do this at the start of every project.
T-th-th-Tha-That’s all folks. Thanks for reading, i hope it helps someone.